Serving of Peas and Pelmini
(click to enlarge)

Pelmeni - Siberian Dumplings


Russia / Siberia   -   Pelmeni

Makes:
Effort:
Sched:
DoAhead:  
150
****
3-1/2 hrs
Yes
These dumplings were traditionally made by the thousands in Siberia and buried in the snow to keep frozen during the winter. Today they are a wildly popular all over Russia
In Russia, Pelmeni are both made at home and served by specialist dumpling restaurants. Siberian Pelmeni are made with a mix of two or three meats. In Perm Krai, just west of Siberia, pelmeni made with turnip and mushroom are popular.

Making Pelmeni


3
2/3
1
1

c
t
lrg
c

Flour (1)
Salt
Egg
Water, cold  

Dough

  -   (15 min + 30 min rest)
The amounts given here will be sufficient for about 160 pelmeni, 120 if you don't recondition the offcuts and make a 4th ball.
  1. In a Stand Mixer with dough hook, or in a Food Processor with dough blade, mix Flour and Salt.
  2. With motor running, add Egg, then pour in Water in a slow, stream until the dough forms a ball around the dough hook or dough blade. You should not have used quite the whole cup of water.
  3. Transfer to a lightly floured board and knead by hand for a few minutes until nice and smooth. Make sure the ball is not sticky. If it is, knead it with a dusting of flour until it isn't.
  4. Cover with thin plastic so it won't dry out and let it rest for about 30 minutes, while you work on filling and set-up.

Flour:

  Unbleached flour is preferred for a denser, stronger dough.

1
ar


Egg White  
Flour

Assembly and Forming

  -   (120 pelmeni: 3 hours including set-up and take-down)
(Click on Image for Larger View)
Forming Pelmini

In Russia today, many people use a Pelmennitsa (pelmeni mold) to save a lot of time. It is similar to a Ravioli Mold, but honeycomb shaped rather than square. Commercially, Pelmeni are made using complex pasta machines imported from Italy.

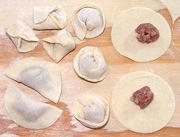
Here we make them the traditional way. Exact time will depend on your dexterity and how fast you work. The photo shows half moon (varenyky), envelope, and flying saucer folds.

I do all the work on a 2-1/2 foot square sheet of plywood, lightly varnished on the working side. You will also need a Rolling Pin, preferably the French tapered kind, a 2-1/4 to 2-1/2 inch cookie cutter, an 18 x 13 inch rimmed baking sheet, and, hopefully a Piping Bag (pastry bag) with a 1/2 inch plain round nozzle.

  1. Check that you can get the Baking Sheet into the freezer compartment of your refrigerator and still close the door.
  2. Beat 1 Egg White moderately so it is uniformly liquid. Pour into a shallow bowl.
  3. Flour your working board lightly, but completely enough so your dough will not stick.
  4. Divide your Dough Ball into three equal sized balls. Make sure they aren't sticky or you will have problems. If they are sticky, just knead a powdering of flour into it. Keep one ball out and cover the rest with thin plastic.
  5. Roll out one ball very thin, but not quite translucently thin, making sure the sheet can slide on the board. Spread a little more flour under it as needed.
  6. Cut out about 15 or so 2-1/4 inch circles. Give the cutter a bit of a twist to make sure the cut is complete. Free them by peeling up the dough in between. Keep the off-cuts under plastic if you intend to use them for a 4th ball. Move the circles up front where you can work with them, and cover the rest of the sheet with thin plastic so it won't dry out while you work.
  7. Use your Piping Bag to squeeze out the right amount of filling onto each circle, a little towards you from exactly centered. Because meat fillings tend to have some stringy stuff in them, you will likely have to use a knife to scrape it off at the nozzle.
  8. Working with one circle at a time, wet your index finger in the Egg White and wipe it around the edge opposite from you.
  9. Carefully fold the near edge over the stuffing and stick down to the far edge, making sure all the stuffing is inside. Work the edge from the center out, driving out any air. Now you have a Ukrainian Varenyky. Go on and do all the other circles you have cut.
  10. Touch one point of each dumpling with Egg White. For envelope fold, wrap the dry point over the stuffing, then wrap the wetted one across to stick to the other one. For flying saucer form, bring the points together along the straight side, allowing the curved edge to curl up around the stuffing (see Photo). The flying saucer form is fancier and cooks more evenly, but doesn't take much more time or skill than the envelope form, but it does take more room on the freezing sheet and in the the bag. Another way is to put pleats in it as you seal the main edge and leave it at that, but that form looks like it takes a lot of practice.
  11. Lightly flour your Baking Sheet and place the finished Pelmeni on it as close together as you can without them touching (a little touching of the edges is not a problem). Cover with thin plastic while you work on more.
  12. Keep at it until you have completely filled the baking sheet, or run out of something.
  13. Slide the Baking Sheet into the freezer compartment of your refrigerator and let the Pelmeni freeze. Traditionally, Pelmeni are rarely cooked before they have been frozen.
  14. Pry the Pelmeni off the baking sheet and bag them in a plastic bag. They can be kept frozen for months.

a/r
a/r


Water
Salt

Cooking

  -   (8 min / batch)
  1. Bring plenty of cold Water up to a boil and stir in about 1/2 Tablespoon of Salt per quart of water, same as for pasta. Pelmeni can also be cooked in broth.
  2. Stir Pelmeni into rapidly boiling Water. Do not crowd the pot! Let boil until Pelmeni float to the surface, then give them 4 or 5 minutes more (they will float before sufficiently cooked).
  3. Scoop them out with a shallow strainer and drain.


Serving Pelmeni

Pelmeni are served various way, but most commonly tumbled with Butter. They can also be fried lightly brown in butter - not traditional but often done today. I particularly recommend this for vegetarian versions which need a little bump in flavor.

Condiments on the side may include Vinegar, Sour Cream, a mix of Sour Cream and Vinegar, and Lemon Juice. In the Russians Far East, Soy Sauce is often provided, and also in Australia since most Russians there came through China or the Far East.

See Photo for one of my favorite servings - but it's not quite 100% authentic. The Pelmeni are very lightly fried in butter, then served over a bed of Frozen Peas and Onions, also lightly fried in Butter. It is all garnished with chopped Dill and Parsley. Although some Russians may have served Pelmeni with peas (I don't know for sure), and all the rest of the ingredients are authentic enough - in Russia it would be Canned Peas - just like here during the Eisenhower Administration.

Lemon Juice goes very well with this serving, but provide lemon as wedges. If you mix lemon juice into the peas they will soon become the same Army olive drab color as real Soviet canned peas (although they will still taste better).

Serving Pelmeni with peas is not only delicious, it's a very good idea for buffet service. Mixing them into a pile of peas discourages a few greedy people from just scooping up all the Pelmeni and leaving none for others.


Fillings

The amount of fillings here will be sufficient for the amount of dough given above, divided into three balls, plus a 4th ball formed from the leftovers from cutting the circles. Actually, my freezer compartment is so jammed it can hold only one baking sheet with about 120 pelmeni made from three balls, so I form the left over filling into patties and fry them.

8
8
8
2/3
1/3

oz
oz
oz
t
t
Beef, ground  
Pork, ground
Onions
Salt
Pepper

Meat Filling

  -   (30 min, grinding your own meats)
Note that the meats should be a little fatty, and they should be ground or chopped fine, but not to mush. Persons who have tried to replace pork with other meats report inferior pelmeni, though lamb probably works much better than turkey, and is sometimes used.
  1. Grind or chop fairly fine, BEEF and PORK, if not purchased ground. Note: meat should be very cold before sending through the grinder or chopping.
  2. Chop ONIONS very fine. Some recipes call for puréeing them, but I find puréed onions rather bitter, and the bitterness doesn't cook out easily.
  3. Mix All Items very thoroughly.
10
13
8
1/2
2/3
1/3
oz
oz
oz
T
t
t
Turnip
Mushrooms (2)  
Onion
Oil
Salt
Pepper

Perm Filling - Vegetarian

  -   (50 minutes + cooking time for Turnip)
Perm, administrative center of the Krai of Perm, is just outside the western edge of Siberia. While meat Pelmeni are certainly eaten in Perm, vegetable fillings are also popular there. All I've been able to find is that Turnips and Mushrooms are used, no other details, so I've used both in this recipe. The amounts given here will make about 140 pelmeni.
  1. Peel TURNIP. Place in a pot of water and bring to a boil. Simmer until cooked through, and a sharp skewer passes through without hitting a stiff spot. Drain and cool.
  2. Chop Turnip fine or mash.
  3. Chop MUSHROOMS quite small and evenly so they won't be clogging the piping bag nozzle. I use a Mezzaluna for the chopping as it will not scatter pieces all over as chopping with a regular knife will.
  4. Chop ONION very fine.
  5. In a skillet, heat Oil and fry Onion just until translucent, but no browning. Then stir in Mushrooms and fry over moderate heat, stirring now and then, until they have softened and given up nearly all their water - you don't want any free water in the final mix. Let cool.
  6. Mix all Items.

Mushrooms:

  Regular white mushrooms will work here, but I prefer at least half the small king trumpets now easily available here in Southern California. Also, a couple of fresh Shiitakes would help intensify the flavor. In Russia, dried mushrooms, usually Porcini, are often used, but those are not so commonly available in North America, and take a few hours of soaking and an hour simmering to prepare them.

Serving:

  After cooking these in boiling water, I recommend frying them lightly browned in butter, as they could use a little flavor boost to compete with meat pelmeni.

NOTES:
  1. U.S. measure: t=teaspoon, T=Tablespoon, c=cup, qt=quart, oz=ounce, #=pound, cl=clove in=inch, ar=as required tt=to taste
uax_pelme1 151202 pttt407 & many others   -   www.clovegarden.com
©Andrew Grygus - agryg@aaxnet.com - Linking to and non-commercial use of this page is permitted.