


SAFARI
Users
- General & Historical
- Equipment You Will Need
- Decisions, Decisions, Decisions - the plan
- Procedure - step by step
- Stuffing or Dressing? - and "how to".
- Gravy - a parallel procedure
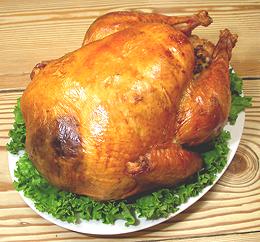
- Presenting and Carving a Turkey
- Safety Tips
- Links
General & Historical
The domestic turkey was developed by the Aztecs and their predecessors in Mexico, but the roasting methods we are so familiar with were developed in Europe, originally for roasting Peacocks. You will find a lot more fascinating but useless information on our Turkey page.
In recent years a lot of research has been done on how to roast a turkey with the least trouble, with a high probability the meat will be moist and tender, and with a low probability the guests will die of bacterial infestation. The method we present here is based on this research and is current "best practices".
In 2006 the Los Angeles Times kitchen did a carefully controlled test of four methods of roasting turkeys: salting, brining, high temperature roasting and the traditional covered roaster. Salting finished first, brining second and the covered roaster third, all with pretty good results. High temperature roasting finished last due to uneven cooking. We cover salting and brining here and the covered roaster method on the Method #2 page.
Equipment You Will Need
An oven
with good temperature control and sufficient room for the turkey and its roasting pan.A roasting pan
. Highly preferred are shallow pans fitted with a "V" rack, and with convenient handles on the pan and the "V" rack. These are readily available at prices from $15 to $150. Disposable aluminum pans are too flimsy for even a small turkey - a disaster waiting to happen - and they have no rack.If brining
, a pot, bucket or watertight brining bag of sufficient size to hold the turkey and enough water to submerge it completely .If salting
, a watertight bag sufficient to hold the turkey.Salt
, lots of it (If salting or brining the turkey).A refrigerator
with enough room for the turkey submerged in a brining bucket or in a brining bag.Aluminum foil
, wide.Rubber Oven Gloves
- these are for turning the turkey over part way through roasting and removing it from the V-rack after roasting. If you don't have them, or are as outraged by the price as I am, get the thickest set of flock or fabric lined rubber dish washing gloves they have at your local market, in size "extra large". These will do fine if you are organized and work quickly. "Turkey lifters" and other gadgets generally don't work well.A meat thermometer
with a probe long enough to penetrate to the center of the turkey. One with a long cable that allows you to monitor the bird without opening the oven is great, and some are quite affordable.Bamboo skewers
.A basting brush
(a clean 1" natural bristle paint brush will do).Butter
, and something to melt it in.
Decisions, Decisions, Decisions
The first challenge is what turkey to buy, then the general plan of action - there's a lot to consider.
Weight?
Fortunately you aren't going to find any of those 80 pounders at your local supermarket. The larger and heavier the turkey the more hassle you'll have with it, the longer it'll take and the more leftovers you'll have to deal with. Here's a chart of weights by approx roasting time, servings yield, and refrigerator thaw time if frozen (refrigerator thawing is not recommended - see below).Weight Unstuffed 325°F Stuffed 325°F Servings Fridge Thaw 4 - 8 lbs 1-1/4 to 2-3/4 hrs 2-3/4 to 3-1/2 hrs 3 to 5 1-1/2 to 2 days 8 - 12 lbs 2-3/4 to 3 hrs 3 to 3-1/2 hrs 5 to 8 2 to 3 days 12 - 14 lbs 3 to 3-3/4 hrs 3-1/2 to 4 hrs 8 to 9 3 to 3-1/2 days 14 - 18 lbs 3-3/4 to 4-1/4 hrs 4 to 4-1/2 hrs 9 to 12 3-1/2 4-1/2 days 18 - 20 lbs 4-1/4 to 4-1/2 hrs 4-1/2 to 4-3/4 hrs 12 to 13 4-1/2 to 5 days 20 - 24 lbs 4-1/2 to 5 hrs 4-3/4 to 5-3/4 hrs 13 to 16 5 to 6 days 24 - 30 lbs 16 to 20 6 to 7 days Fresh or Frozen?
These terms are defined by U.S. Department of Agriculture.- "Fresh" turkeys can be cooled to 26°F, well below the freezing point of water so they may have ice inside but the flesh should still be pliable. Rinse the ice out of them and they're ready to start working with. A turkey that has dipped below 26°F must be labeled "previously frozen".
- "Frozen" turkeys are generally stored below 0°F.
- Thawing: FDA insistence that turkeys be thawed in the
fridge at 40°F or below (see time chart above) is absolute bunk, even
dangerous, and there's no supporting data for it. The bacteriaphobes at
the USDA have always approved cold water thawing as safe for commercial
preparation. Actual tests showed higher bacteria counts for refrigerator
thawing and a high risk of contaminating other food items. If you won't
be ready to cook when nearly thawed just slip the critter into the fridge
until needed (being careful to avoid contaminating other stuff), but do
cook as soon as possible.
While refrigerator thawing is still the current FDA/USDA recommendation, their instructions for cold water thawing seem similarly unreasonable. "Keep turkey sealed in its bag, make sure the bag has no leaks (put it in another bag if it does), and allow 1/2 hour per pound and change the water every 1/2 hour" (that's 10 hours for a 20 pound turkey). I'm pretty sure unbagged thawing in rapidly changing cold water would be more effective and probably safer - so that's how I do it, and I haven't died yet.
Processing & Packaging?
- Self Basting: Meat pumped full of stuff at a turkey factory. The stuff varies greatly from one manufacturer to another but is supposed to assure the breast meat is moist and edible no matter what. Flavor may be OK or a bit odd depending on composition of additives. Do not salt or brine.
- All Natural: Not pumped full of stuff - good for salting or brining.
- Kosher: Processed by hand through several tedious steps involving salt and draining. The price will be higher than for regular turkeys. Do not salt or brine.
- Free Range: Double the price but tastier, and still works well with this open roaster method.
- Heritage: These need to be ordered months in advance and the price is definitely in the Yuppie / Gourmet range. You can expect excellent flavor, and the Covered Roaster method is very much the way to do these.
- Future Turkey: We hope the move to flavor will result in "Heritage" class birds at "Free Range" prices when volume ramps up - but we aren't anywhere near there yet.
Salt or Brine or Not?
The point of salting or brining is to assure the meat will be moist and tasty after cooking. Brining soaks some salt into the meat and salt absorbs water, thus moist flesh. Do not brine "self basting" or kosher turkeys. In the first case, whatever concoction the factory has injected the turkey with is supposed to do the moisturizing job, and with a kosher turkey it's already pretty salty (tasters generally prefer brined over kosher, but if you're keeping kosher, enjoy).Salting:
This method is overtake brining here in California due to experiments by the Los Angles Times kitchen. It provides superior results and is less of a problem since all that water isn't needed.Salt & Seasoning Rub?
This has a similar objective to brining but the exposure time is very short and it's more appropriate for turkeys roasted by the Covered Roaster method. If using drippings for gravy, make sure all the salt is removed before roasting.Tom or Hen?
Some "experts" prefer a tom (male) in the larger sizes since they say some hens tend to have breast meat so thick other parts will be overdone by time the breast is up to temperature. Other "experts" say there's really no difference except size range. In any batch of turkeys the larger will be the toms and the smaller will be hens.Stuffing or Dressing?
Stuffing the turkey is traditional, but most experts today recommend baking the stuffing in a separate casserole, in which case it is called "dressing". Add some chicken stock to it to replace juices from the bird (see our page Turkey Stuffing & Dressing for complete details and procedures). The reason to do dressing is a shorter roasting time and much better control over doneness of the turkey, thus greater probability the meat will be moist. In most cases, little flavor is imparted to the turkey from the dressing so there is little lost there.A trick I've used successfully is to just stuff the front cavity so the breast is nicely plumped out and do the rest as dressing. This stuffing is relatively shallow and will easily be up to temperature, and may slow down cooking of the breasts a little giving the thighs a chance to catch up.
Make Gravy or Not?
Traditionally, a stock is made from the neck, giblets and other offcut parts. This is mixed with defatted drippings from the pan plus additional stock and thickened into gravy for the meat and potatoes. Some modern menu plans have no need for gravy, so making it isn't always necessary. Gravy adds a serious element of complexity, but can be done successfully, if properly organized and as much as possible done in advance (see our Turkey Gravy) page.Air Dry?
This is a gourmet trick to get the crispest possible skin, but it adds an entire day to the preparation cycle and ties up refrigerator space. If you have a spare refrigerator you may consider this. After draining the brine and rinsing, dry the turkey with paper towels and place on a wire grate on a small baking sheet in the refrigerator and leave uncovered for 8 to 24 hours.
Procedure
This procedure is for a natural turkey that is fresh or thawed and will be salted or brined. If you have a "self basting" or kosher turkey, skip the brining steps. Not salting or brining a natural bird risks drier, less flavorful meat. My recommendation is to use a fresh turkey if at all possible instead of frozen - it's easier, safer and takes less planning.
Lead Times
- these are the ideal times.- Thawing: 8 hours for cold water thaw (see notes under "Decisions" above).
- Brining: 24 hours.
- Salting: 3 days.
- Air Drying (optional): 1 extra day.
Pre-Prep
-Four to One Days Ahead
Thaw your turkey
- thoroughly de-ice fresh turkeys. Unpackage the turkey, fish out the neck and the bag of giblets and set them aside.Brining:
Submerge the turkey in a tub of cold brine and place it into the refrigerator for the required time:- For a 4 hour brine (not recommended), 1 cup of salt per gallon of water.
- For an overnight brine, 2/3 cup of salt per gallon of water and figure about 1 hour per pound of turkey. Do not overbrine.
It is possible to brine a turkey outside the refrigerator in a covered cooler with an ice pack but make sure the brine temperature never goes above 40°F.
Salting:
Figure 1 T of salt for every 4-1/2 pounds of turkey. Grind the salt to powder in your spice grinder and spread over the turkey, more salt in thicker parts. Put up in a water-tight bag and refrigerate. The ideal timing is three days in the fridge, turning the turkey at least once a day.Air Drying:
(optional) Place the turkey on a pan in the refrigerator uncovered for one day. This step is to produce a crisper skin but I've never had time for it.Prepare a Broth
from the neck, giblets and wing tips. This broth may be used for making gravy, moistening and flavoring dressing, or any other broth use (see "Evening Before" steps for Turkey Gravy for the procedure).
T Day
- Prepare your stuffing / dressing by whatever recipe you chose to use.
- Prepare your roasting pan. Cover the V-rack with aluminum foil and punch a bunch of holes through it so it'll drain well.
- IF you are making gravy, put a cup each of chopped celery, carrots and onions in the roasting pan along with 3 cups of water to keep it from burning until the turkey starts dripping (rather late in the process).
- Preheat the oven to 400°F.
- Remove the turkey from the brine (if used). Rinse thoroughly under running water, drain and pat dry with paper towels.
- Let the turkey rest on the counter for one hour to come close to room temperature.
- IF your turkey did not come with the drumstick ends held by a clip, you can tuck them through a hole cut in the skin under the tail. Failing both, bind the legs together and down to the backbone with heavy string.
- If you cut off the wing tips, fasten the wings to the sides of the turkey with bamboo skewers and break them off to length. If you did not cut off the wing tips, tuck them behind the back. This looks real uncomfortable but at this point the turkey probably won't notice.
- IF you are stuffing the bird, do so just before it goes into the oven, not earlier. Give the cooking temperature a head start by first heating the stuffing as hot as you can handle it. For complete details see our page Turkey Stuffing & Dressing.
- If stuffing the bird, first stuff the front and use a bamboo skewer to fasten the front skin to the back behind the neck. Then stuff the main cavity. Do not pack stuffing too tight as most stuffings expand some during roasting.
- Melt butter and paint the breast side of the turkey well with butter. Place the turkey breast side down in the V-rack (you'll be turning it over later), then paint the back side well with butter.
- Slide the roasting pan into the oven with the turkey still breast side down. Keep the thigh end at the hottest end of the oven, usually the back. Roast 45 minutes for a bird up to 18 pounds, 1 hour if over that.
- Bring the roasting pan out of the oven, put on the rubber oven gloves (see equipment list), pick up the turkey and turn it breast side up.
- Brush the breast side again with butter.
- Tent the breast side loosely with aluminum foil (this will come off for the last 30 to 45 minutes of roasting).
- IF making gravy, check if the vegetables need more water.
- Turn the oven down to 325°F for a bird over 14 pounds, or 350°F for smaller or any size if it is not stuffed. Slide the turkey into the oven, again with the thigh end to the hottest end of the oven.
- Remember to remove the foil tent when you think you have only 45 minutes to go so the skin will brown nicely (you can put it back on if you guessed wrong) Generally at 155°F/68°C works.
- Roast until done. It is done when the thermometer shows you are going
to meet USDA mandated temperatures of 165°F/74°C (thermometer
must not be touching bone). We pull at 5°F lower than the USDA
recommendations because the inside temperatures will rise about 5°F
while the turkey is resting. See Safety Notes below for more on
temperature.
Pull when the thickest part of the thigh reaches 160°F/71°C.
Total roasting time should be similar to the USDA 325°F chart.USDA Approx Roasting Time at 325°F Pounds Unstuffed Stuffed 4 to 8 1-1/4 to 3-1/4 hr 2-3/4 to 3-1/4 8 to 12 2-3/4 to 3 hr 3 to 3-1/2 hr 12 to 14 3 to 3-3/4 hr 3-1/2 to 4 hr 14 to 18 3-3/4 to 4-1/4 hr 4 to 4-1/4 hr 18 to 20 4-1/4 to 4-1/2 hr 4-1/4 to 4-3/4 hr 20 to 24 4-1/2 to 5 hr 4-3/4 to 5-1/4 hr - Remove turkey from the roasting pan (rubber gloves, again) and place it on a platter or baking sheet to catch juices that still come out (add them to the broth).
- Cover the turkey lightly with aluminum foil and let it rest for at least 1/2 hour (45 minutes wouldn't hurt). This gives the juices time to redistribute and the meat to solidify so it is possible to carve the turkey in an organized manner and without injury. See our page Presenting and Carving a Turkey for detailed instructions.
- Get any side dishes that need oven finishing into the oven.
- Finish up the gravy if making it.
Aftermath
- Dismantle the turkey for leftovers and refrigerate within 2 hours of taking from the oven.
- Store stuffing, gravy and meat separately. The USDA says to use gravy in less than two days, meat and stuffing within 3 days, but most people consider this rather paranoid. I aim to use up the meat in less than a week. You can extend the storage life of the stuffing and gravy by bringing them up to a simmer.
- After cutting off all the meat, break up the carcass and put it in a stock pot with any bones and other turkey debris. Add any leftover broth you haven't used for gravy. Put in enough cold water to cover and simmer for a few hours for turkey broth. Strain, remove the fat (gravy separator again), let the sediment settle, pour liquid off sediment, Freeze or pack in sterile jar (see instructions at the bottom of our page Presenting and Carving a Turkey.
Stuffing & Dressing
"Dressing" is the same as "stuffing", but baked in a casserole rather than stuffed into the turkey. This gives better control of the turkey (you need only meet 2 USDA temperature points, not three) and a shorter roasting time.
Complete details and procedures will be found on our page Turkey Stuffing & Dressing.
Gravy
Traditionally, the neck, giblets and pan drippings are used to make gravy to go along with the meat and potatoes. Gravy adds complexity but can be managed if well planed and done as much as possible in advance. Complete instructions will be found on the page Turkey Gravy.
Safety Tips
During life the turkey has natural processes for keeping bacteria under control, but the moment it is killed those processes stop and bacteria immediately start dismantling it. Some of these bacteria are harmful to humans and some of them can survive rather adverse conditions, so care is in order to protect your health and the health of your guests.
A turkey is so large that temperatures changes take a long time, so it presents an unusually high risk of contamination. Consequently exceptional care in handling is indicated.
- Do not refrigerate a turkey after stuffing, cook immediately. Preferably stuff with very hot stuffing and get it into the oven at once.
- Observe cooking temperatures given above and take them seriously.
Harmful bacteria multiply very rapidly at temperatures between
40°F/4.5 °C and 140°F/60°C, a range your turkey will be
in for most of the cooking time.
Note: Thermometers and many cookbooks say poultry must go to 180°F/82°C to be safe. The FDA backed off from this bunk in 2006 and came in line with the USDA's 165°F/74°C. The FDA failed to find any evidence, even scribbled notes, to justify that ruinous high temperature (perhaps they were paid off by the beef board to assure turkeys were always dried out and flavorless). - When handling an uncooked turkey, do not handle any other food until you have cleaned up with soap and water.
- Do not let an uncooked turkey come in contact with any other food.
- Immediately upon moving an uncooked turkey, scrub the cutting board or surfaces it was touching with soap and water and preferably a little bleach. I generally scrub everything with an "institutional strength" disinfecting cleanser which releases bleach in the process.
- Observe that leftovers should be in the refrigerator within 2 hours of coming out of the oven. If there are large amounts store in multiple smaller containers so the temperature will drop quickly.
Links
- T3 - Turkey Preparing & Roasting - U.S. Department of Agriculture